ubuntu 系统安装 下载镜像 1 https://mirrors.tuna.tsinghua.edu.cn/ubuntu-releases/18.04/ubuntu-18.04.6-desktop-amd64.iso
使用物理机或者虚拟机安装都可以
换源 备份源列表 1 sudo cp /etc/apt/sources.list /etc/apt/sources.list.bak
修改 sources.list 文件 1 sudo gedit /etc/apt/sources.list
更改为清华镜像源 1 2 3 4 5 6 7 8 9 10 11 12 # 默认注释了源码镜像以提高 apt update 速度,如有需要可自行取消注释 deb https://mirrors.tuna.tsinghua.edu.cn/ubuntu/ bionic main restricted universe multiverse # deb-src https://mirrors.tuna.tsinghua.edu.cn/ubuntu/ bionic main restricted universe multiverse deb https://mirrors.tuna.tsinghua.edu.cn/ubuntu/ bionic-updates main restricted universe multiverse # deb-src https://mirrors.tuna.tsinghua.edu.cn/ubuntu/ bionic-updates main restricted universe multiverse deb https://mirrors.tuna.tsinghua.edu.cn/ubuntu/ bionic-backports main restricted universe multiverse # deb-src https://mirrors.tuna.tsinghua.edu.cn/ubuntu/ bionic-backports main restricted universe multiverse deb https://mirrors.tuna.tsinghua.edu.cn/ubuntu/ bionic-security main restricted universe multiverse # deb-src https://mirrors.tuna.tsinghua.edu.cn/ubuntu/ bionic-security main restricted universe multiverse # 预发布软件源,不建议启用 # deb https://mirrors.tuna.tsinghua.edu.cn/ubuntu/ bionic-proposed main restricted universe multiverse # deb-src https://mirrors.tuna.tsinghua.edu.cn/ubuntu/ bionic-proposed main restricted universe multiverse
更新并升级 1 sudo apt-get update && sudo apt-get upgrade
安装依赖库 1 sudo apt-get install -y device-tree-compiler python flex bison ncurses-dev libssl-dev lsb-core lib32stdc++6
安装交叉编译工具链 安装编译器 1 mkdir ~/linux/tools && cd ~/linux/tools
下载交叉编译链 1 wget https://releases.linaro.org/components/toolchain/binaries/4.9-2017.01/arm-linux-gnueabihf/gcc-linaro-4.9.4-2017.01-x86_64_arm-linux-gnueabihf.tar.xz
创建文件夹并解压 1 sudo mkdir /usr/local/arm && sudo tar -vxf gcc-linaro-4.9.4-2017.01-x86_64_arm-linux-gnueabihf.tar.xz -C /usr/local/arm
配置环境变量 1 2 3 sudo vim ~/.bashrc export PATH=$PATH:/usr/local/arm/gcc-linaro-4.9.4-2017.01-x86_64_arm-linux-gnueabihf/bin source ~/.bashrc
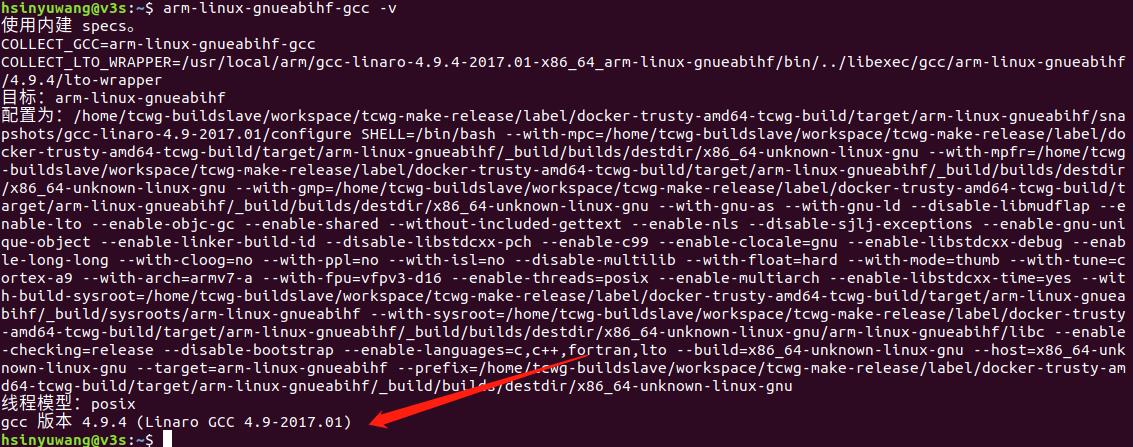
验证是否安装成功 1 arm-linux-gnueabihf-gcc -v
uboot 编译 获取 uboot 1 2 mkdir ~/v3s && cd ~/v3s git clone https://github.com/Lichee-Pi/u-boot.git -b v3s-current
uboot 的目录结构
1 2 3 4 5 6 7 8 9 10 11 12 13 14 15 16 17 18 19 20 21 22 23 24 25 26 ├── api 存放uboot提供的API接口函数 ├── arch 平台相关的部分我们只需要关心这个目录下的ARM文件夹 │ ├──arm │ │ └──cpu │ │ │ └──armv7 │ │ └──dts │ │ │ └──*.dts 存放设备的dts,也就是设备配置相关的引脚信息 ├── board 对于不同的平台的开发板对应的代码 ├── cmd 顾名思义,大部分的命令的实现都在这个文件夹下面。 ├── common 公共的代码 ├── configs 各个板子的对应的配置文件都在里面,我们的Lichee配置也在里面 ├── disk 对磁盘的一些操作都在这个文件夹里面,例如分区等。 ├── doc 参考文档,这里面有很多跟平台等相关的使用文档。 ├── drivers 各式各样的驱动文件都在这里面 ├── dts 一种树形结构(device tree)这个应该是uboot新的语法 ├── examples 官方给出的一些样例程序 ├── fs 文件系统,uboot会用到的一些文件系统 ├── include 头文件,所有的头文件都在这个文件夹下面 ├── lib 一些常用的库文件在这个文件夹下面 ├── Licenses 这个其实跟编译无关了,就是一些license的声明 ├── net 网络相关的,需要用的小型网络协议栈 ├── post 上电自检程序 ├── scripts 编译脚本和Makefile文件 ├── spl second program loader,即相当于二级uboot启动。 ├── test 小型的单元测试程序。 └── tools 里面有很多uboot常用的工具。
修改 include/configs/sun8i.h 在文件中添加
1 2 3 4 5 6 #define CONFIG_BOOTCOMMAND "setenv bootm_boot_mode sec; " \ "load mmc 0:1 0x41000000 zImage; " \ "load mmc 0:1 0x41800000 sun8i-v3s-licheepi-zero-dock.dtb; " \ "bootz 0x41000000 - 0x41800000;" #define CONFIG_BOOTARGS "console=tty0 console=ttyS0,115200 panic=5 rootwait root=/dev/mmcblk0p2 earlyprintk rw vt.global_cursor_default=0"
编译 uboot 修改,configs/LicheePi_Zero_defconfig
1 CONFIG_VIDEO_LCD_BL_PWM="PB4"
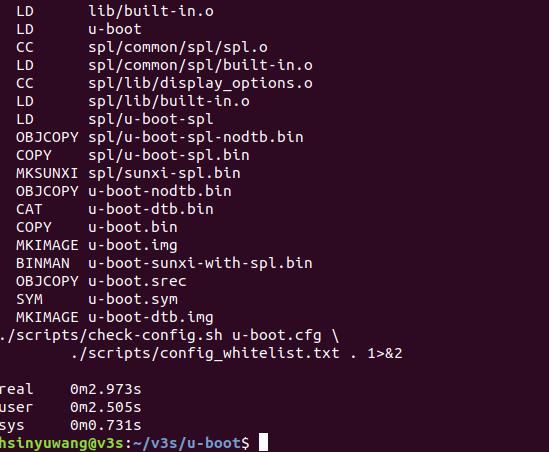
1 2 3 4 cd u-boot make ARCH=arm CROSS_COMPILE=arm-linux-gnueabihf- LicheePi_Zero_defconfig make ARCH=arm menuconfig time make ARCH=arm CROSS_COMPILE=arm-linux-gnueabihf- 2>&1 | tee build.log
在 uboot 顶层 Makefile 的 248 行,添加默认编译器,就可以直接用 make 编译了。
1 2 3 4 5 6 7 8 9 10 # set default to nothing for native builds ifeq ($(HOSTARCH),$(ARCH)) CROSS_COMPILE ?= endif ARCH ?= arm CROSS_COMPILE ?= arm-linux-gnueabihf- KCONFIG_CONFIG ?= .config export KCONFIG_CONFIG
编译成功
后面编译好 kernel 和 rootfs 然后一起烧录
主线 Linux 编译 下载源码 1 2 cd ~/v3s git clone -b zero-5.2.y https://github.com/Lichee-Pi/linux.git
修改顶层 Makefile 在内核根目录下的 Makefile 364 行修改默认编译器,可以直接用 make 编译
1 2 3 # ARCH ?= $(SUBARCH) ARCH ?= arm CROSS_COMPILE ?= arm-linux-gnueabihf-
配置 ili9341 LCD 1 2 3 cd linux make ARCH=arm CROSS_COMPILE=arm-linux-gnueabihf- licheepi_zero_defconfig make ARCH=arm CROSS_COMPILE=arm-linux-gnueabihf- menuconfig
勾选驱动
1 2 3 4 5 6 7 8 9 10 11 Device Drivers ---> Input device support ---> <*> Joystick interface [*] Joysticks/Gamepads ---> <*> X-Box gamepad support [*] X-Box gamepad rumble support [*] LED Support for Xbox360 controller 'BigX' LED [ * ] Staging drivers ---> <*> Support for small TFT LCD display modules ---> <*> FB driver for the ILI9341 LCD Controller <*> Generic FB driver for TFT LCD displays
修改设备树 arch/arm/boot/dts/sun8i-v3s-licheepi-zero.dts
在 chosen 中添加 /delete-node/ framebuffer@0; 删除原来的 simplefb 节点( uboot 里有使能 fb 的操作,必须删除而不是 disable )
1 2 3 4 chosen { stdout-path = "serial0:115200n8"; /delete-node/ framebuffer@0; };
删除 &i2c0 节点
1 2 3 4 5 6 7 8 &i2c0 { status = "okay"; ns2009: ns2009@48 { compatible = "nsiway,ns2009"; reg = <0x48>; }; };
修改设备树 arch/arm/boot/dts/sun8i-v3s-licheepi-zero-dock.dts
删除 &lradc 和 &i2c0 ( lradc 用不到,gt911 占用引脚和屏幕的 spi 引脚有冲突,所以删掉)
1 2 3 4 5 6 7 8 9 10 11 12 13 14 15 16 17 18 19 20 21 22 23 24 25 26 27 28 29 30 31 32 33 34 35 36 37 38 39 40 41 42 43 44 45 &lradc { vref-supply = <®_vcc3v0>; status = "okay"; button-200 { label = "Volume Up"; linux,code = <KEY_VOLUMEUP>; channel = <0>; voltage = <200000>; }; button-400 { label = "Volume Down"; linux,code = <KEY_VOLUMEDOWN>; channel = <0>; voltage = <400000>; }; button-600 { label = "Select"; linux,code = <KEY_SELECT>; channel = <0>; voltage = <600000>; }; button-800 { label = "Start"; linux,code = <KEY_OK>; channel = <0>; voltage = <800000>; }; }; &i2c0 { gt911: touchscreen@14 { compatible = "goodix,gt911"; reg = <0x5d>; interrupt-parent = <&pio>; interrupts = <1 5 IRQ_TYPE_EDGE_FALLING>; /* (PB5) */ pinctrl-names = "default"; irq-gpios = <&pio 1 5 GPIO_ACTIVE_HIGH>; /* (PB5) */ reset-gpios = <&pio 2 1 GPIO_ACTIVE_HIGH>; /* RST (PC1) */ /* touchscreen-swapped-x-y */ }; };
在最后添加
1 2 3 4 5 6 7 8 9 10 11 12 13 14 15 16 17 &spi0 { status = "okay"; ili9341@0 { compatible = "ilitek,ili9341"; reg = <0>; spi-max-frequency = <60000000>; rotate = <270>; bgr; fps = <50>; buswidth = <8>; reset-gpios = <&pio 1 2 GPIO_ACTIVE_LOW>; dc-gpios = <&pio 1 5 GPIO_ACTIVE_LOW>; debug = <0>; }; };
这样启动时的信息会通过 ili9341 LCD 显示
5.2 内核需要修改 drivers/staging/fbtft/fbtft_core.c 的 fbtft_request_one_gpio() 方法,否则开机 log 会报申请 gpio 失败
注意需要在该文件引入下面头文件,否则编译报错
1 #include <linux/of_gpio.h>
1 2 3 4 5 6 7 8 9 10 11 12 13 14 15 16 17 18 19 20 21 22 23 24 25 26 27 28 29 30 31 32 33 34 35 36 37 38 static int fbtft_request_one_gpio(struct fbtft_par *par, const char *name, int index, struct gpio_desc **gpiop) { struct device *dev = par->info->device; struct device_node *node = dev->of_node; int gpio, flags, ret = 0; enum of_gpio_flags of_flags; if (of_find_property(node, name, NULL)) { gpio = of_get_named_gpio_flags(node, name, index, &of_flags); if (gpio == -ENOENT) return 0; if (gpio == -EPROBE_DEFER) return gpio; if (gpio < 0) { dev_err(dev, "failed to get '%s' from DT\n", name); return gpio; } //active low translates to initially low flags = (of_flags & OF_GPIO_ACTIVE_LOW) ? GPIOF_OUT_INIT_LOW : GPIOF_OUT_INIT_HIGH; ret = devm_gpio_request_one(dev, gpio, flags, dev->driver->name); if (ret) { dev_err(dev, "gpio_request_one('%s'=%d) failed with %d\n", name, gpio, ret); return ret; } *gpiop = gpio_to_desc(gpio); fbtft_par_dbg(DEBUG_REQUEST_GPIOS, par, "%s: '%s' = GPIO%d\n", __func__, name, gpio); } return ret; }
修改引脚 bug
fbtft_bus.c 的 fbtft_write_vmem16_bus8() 方法
1 2 3 4 5 6 7 8 9 10 11 12 13 14 15 16 17 18 19 20 21 22 23 24 25 26 27 28 29 30 31 32 33 34 35 36 37 38 39 40 41 42 43 44 45 46 47 48 49 50 51 52 53 54 int fbtft_write_vmem16_bus8(struct fbtft_par *par, size_t offset, size_t len) { u16 *vmem16; __be16 *txbuf16 = par->txbuf.buf; size_t remain; size_t to_copy; size_t tx_array_size; int i; int ret = 0; size_t startbyte_size = 0; fbtft_par_dbg(DEBUG_WRITE_VMEM, par, "%s(offset=%zu, len=%zu)\n", __func__, offset, len); remain = len / 2; vmem16 = (u16 *)(par->info->screen_buffer + offset); if (par->gpio.dc) { //printk("dc拉高!\n"); gpiod_set_value(par->gpio.dc, 1); } /* non buffered write */ if (!par->txbuf.buf) return par->fbtftops.write(par, vmem16, len); /* buffered write */ tx_array_size = par->txbuf.len / 2; if (par->startbyte) { txbuf16 = par->txbuf.buf + 1; tx_array_size -= 2; *(u8 *)(par->txbuf.buf) = par->startbyte | 0x2; startbyte_size = 1; } while (remain) { to_copy = min(tx_array_size, remain); dev_dbg(par->info->device, "to_copy=%zu, remain=%zu\n", to_copy, remain - to_copy); for (i = 0; i < to_copy; i++) txbuf16[i] = cpu_to_be16(vmem16[i]); vmem16 = vmem16 + to_copy; ret = par->fbtftops.write(par, par->txbuf.buf, startbyte_size + to_copy * 2); if (ret < 0) return ret; remain -= to_copy; } return ret; }
编译 1 2 3 4 5 make -j4 make -j4 INSTALL_MOD_PATH=out modules make -j4 INSTALL_MOD_PATH=out modules_install # 修改了设备树文件后编译 make dtbs
编译完成后,zImage 在 arch/arm/boot/ ,驱动模块在 out/
设备树文件在 arch/arm/boot/dts/
dock板的设备树:sun8i-v3s-licheepi-zero-dock.dtb
Buildroot 根文件系统构建 获取 Buildroot 1 2 3 4 cd ~/v3s wget https://buildroot.org/downloads/buildroot-2019.08.tar.gz tar xvf buildroot-2019.08.tar.gz && cd buildroot-2019.08/ make menuconfig
基本配置 1 2 3 4 5 6 7 Target options ---> Target Architecture (ARM (little endian)) ---> Target Binary Format (ELF) ---> Target Architecture Variant (cortex-A7) ---> Target ABI (EABIhf) ---> Floating point strategy (VFPv4-D16) ---> ARM instruction set (ARM) --->
编译链工具配置 1 2 3 4 5 6 7 8 9 10 11 12 13 14 Toolchain ---> Toolchain type (External toolchain) ---> *** Toolchain External Options *** Toolchain (Custom toolchain) ---> Toolchain origin (Pre-installed toolchain) ---> (/usr/local/arm/gcc-linaro-4.9.4-2017.01-x86_64_arm-linux-gnueabihf/) Toolchain path ($(ARCH)-linux-gnueabihf) Toolchain prefix External toolchain gcc version (4.9.x) ---> External toolchain kernel headers series (4.0.x) ---> External toolchain C library (glibc/eglibc) ---> [*] Toolchain has SSP support? (NEW) [*] Toolchain has RPC support? (NEW) [*] Toolchain has C++ support? [*] Enable MMU support (NEW)
alsa、sdl、fbv配置 1 2 3 4 5 6 7 8 9 10 11 12 13 14 15 16 17 18 19 20 21 22 23 24 25 26 27 28 29 30 31 32 33 34 Target packages ---> Audio and video applications ---> [*] alsa-utils ---> [*] alsaconf [*] aconnect [*] alsactl [*] alsaloop [*] alsamixer [*] alsaucm [*] alsatplg [*] amidi [*] amixer [*] aplay/arecord [*] aplaymidi [*] arecordmidi [*] aseqdump [*] aseqnet [*] bat [*] iecset [*] speaker-test Graphic libraries and applications (graphic/text) ---> [*] fbv [*] PNG support [*] JPEG support [*] GIF support [*] SDL [*] SDL framebuffer console video driver [*] SDL_gfx [*] SDL_image ---> [*] SDL_mixer [*] SDL_net [*] SDL_sound [*] install playsound tool [*] SDL_TTF
编译 生成的根文件系统在 output/rootfs.tar
TF 卡分区及烧录 TF 卡分区 1 2 3 4 5 6 7 8 9 10 11 12 13 14 15 16 17 18 19 20 21 22 sudo fdisk -l # 首先查看电脑上已插入的TF卡的设备号(一般为 /dev/sdb1,下面以/dev/sdb1为例) sudo umount /dev/sdb1 # 若自动挂载了TF设备,请先卸载(有多个分区则全部卸载) sudo umount /dev/sdb2 sudo fdisk /dev/sdb # 进行分区操作 ##### 操作步骤如下 ##### # 若已存分区即按 d 删除各个分区 # 通过 n 新建分区,第一分区暂且申请为16M(f1c100s)、32M(v3s),剩下的空间都给第二分区 # 第一分区操作:n p 1 2048 +32M # p 主分区、默认 1 分区、默认2048、+32M # 第二分区操作:n 后面全部回车默认即可 # p 主分区、默认 2 分区、默认、默认剩下的全部空间 # p 查询分区表确定是否分区成功 # w 保存写入并退出 ######################## sudo mkfs.ext4 /dev/sdb1 # 将第一分区格式化成EXT4 sudo mkfs.ext4 /dev/sdb2 # 将第二分区格式化成EXT4 # 格式说明 # EXT4:只用于Linux系统的内部磁盘 # NTFS:与Windows共用的磁盘 # FAT:所有系统和设备共用的磁盘
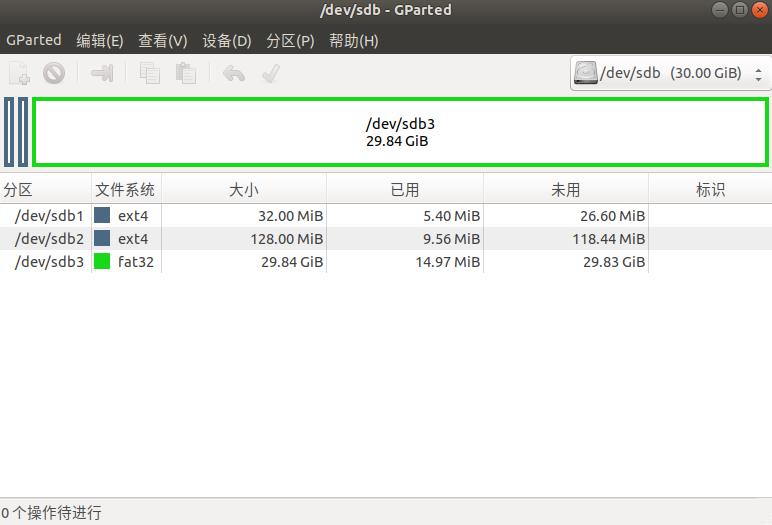
后期为了能够在 windows 上方便添加 rom ,使用 gparted 划分三个分区,最后一个分区为 fat 类型
安装并启动
1 2 sudo apt-get install gparted sudo gparted
分区如下
烧录 uboot 1 2 cd ~/v3s/u-boot/ sudo dd if=u-boot-sunxi-with-spl.bin of=/dev/sdb bs=1024 seek=8
写入内核和设备树 1 2 sudo cp ~/v3s/linux/arch/arm/boot/zImage /挂载的tf卡第一个分区目录 sudo cp ~/v3s/linux/arch/arm/boot/dts/sun8i-v3s-licheepi-zero-dock.dtb /挂载 tf 卡第一个分区目录
写入根文件系统 1 sudo tar xvf ~/v3s/buildroot-2019.08/output/rootfs.tar -C /挂载 tf 卡第二个分区目录
编译模拟器 编译 gpsp 下载 gpsp 源码后解压
复制可执行文件 将生成的可执行文件复制到挂载的 tf 卡第二个分区目录,gpsp 同级目录下必须包含 gba_bios.bin 和 game_config.txt 文件
例如:
在 /root 下创建 gpsp 文件夹,将 gpsp、gba_bios.bin、game_config.txt 复制到 gpsp 文件夹中
系统配置 插入 TF 卡,开机
自动挂载 fat 分区 1 2 3 4 5 mkdir /root/roms vi /etc/fstab # 最后一行添加 /dev/mmcblk0p3 /root/roms vfat defaults 0 0
配置双端显示 1 2 3 4 5 vi /etc/inittab #console::respawn:-/bin/sh ttyS0::respawn:-/bin/sh tty0::respawn:-/bin/sh
启动后开启声音 1 2 3 4 5 6 7 vi /etc/init.d/S99runOnBoot # 添加 amixer -c 0 sset 'Headphone',0 60% unmute # 添加可执行权限 chmod +x /etc/init.d/S99runOnBoot
配置 SDL 环境 1 2 3 4 5 6 7 vi /etc/profile # SDL 配置 export SDL_NOMOUSE=1 # 启动模拟器 /root/startup.sh
自启动模拟器 1 2 3 4 5 6 7 8 9 10 11 12 13 14 15 16 17 18 19 vi /root/startup.sh #!/bin/sh /root/startup.sh for i in `seq 5` do sleep 1s if [ -c "/dev/input/js0" ] then /root/gpsp/gpsp break else if [ $i -eq 5 ] then echo "No gamepad found!" fi fi done chmod +x startup.sh
制作镜像 创建工作目录 1 2 3 4 5 mkdir ~/img cd ~/img mkdir kernel mkdir rootfs mkdir roms
创建空白文件并分区 分区表
分区序号
起始地址
大小
内容
文件系统
1
0
1M
u-boot-sunxi-with-spl.bin
无
2
1 x 1024 x 1024
32M
zImage + sun8i-v3s-licheepi-zero-dock.dtb
ext4
3
33 x 1024 x 1024
128M
rootfs
ext4
4
161 x 1024 x 102/4.jpg4
剩余空间
roms
fat
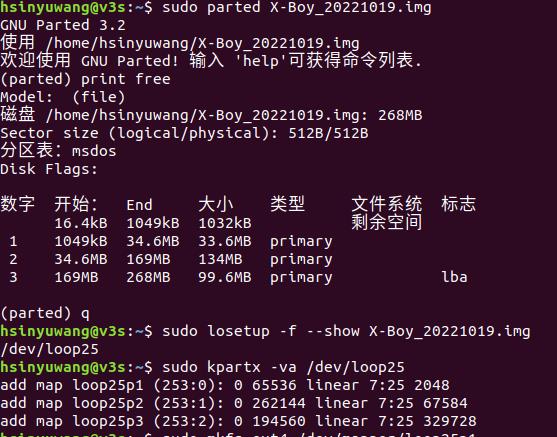
1 2 3 4 5 dd if=/dev/zero of=X-Boy_20221019.img bs=512k count=512 && sync sudo parted X-Boy_20221019.img mklabel msdos sudo parted X-Boy_20221019.img mkpart primary ext4 2048s 67583s sudo parted X-Boy_20221019.img mkpart primary ext4 67584s 329727s sudo parted X-Boy_20221019.img mkpart primary fat32 329728s 100%
检查分区是否创建成功
1 sudo parted X-Boy_20221019.img
输入
将镜像文件虚拟成块设备 1 sudo losetup -f --show X-Boy_20221019.img
这里的 loop25 记录下来 ,以实际显示为准
挂载虚拟文件系统
1 sudo kpartx -va /dev/loop25
格式化块设备并且挂载 格式化分区
1 2 3 sudo mkfs.ext4 /dev/mapper/loop25p1 sudo mkfs.ext4 /dev/mapper/loop25p2 sudo mkfs.vfat /dev/mapper/loop25p3
挂载到之前创建的目录
1 2 3 sudo mount /dev/mapper/loop25p1 ~/img/kernel/ sudo mount /dev/mapper/loop25p2 ~/img/rootfs/ sudo mount /dev/mapper/loop25p3 ~/img/roms/
烧录 uboot 1 2 cd ~/v3s/u-boot/ sudo dd if=u-boot-sunxi-with-spl.bin of=/dev/loop25 bs=512 seek=16
写入内核和设备树 1 2 sudo cp ~/v3s/linux/arch/arm/boot/zImage ~/img/kernel sudo cp ~/v3s/linux/arch/arm/boot/dts/sun8i-v3s-licheepi-zero-dock.dtb ~/img/kernel
写入根文件系统 1 sudo tar xvf ~/v3s/buildroot-2019.08/output/rootfs.tar -C ~/img/rootfs
感谢 steward-fu
STM32-X360-xinput
参考链接 全志V3S(荔枝派zero)学习笔记
荔枝派Zero V3s开发板入坑记录
Linux系统中使用Xbox360手柄
f1c100s spi fbtft ILI9341屏配置
点屏之SPI屏 ili9341
嵌入式Linux–荔枝派Zero–V3s–ST7789v
v3S驱动音频
制作imx6ull Linux系统的img镜像